
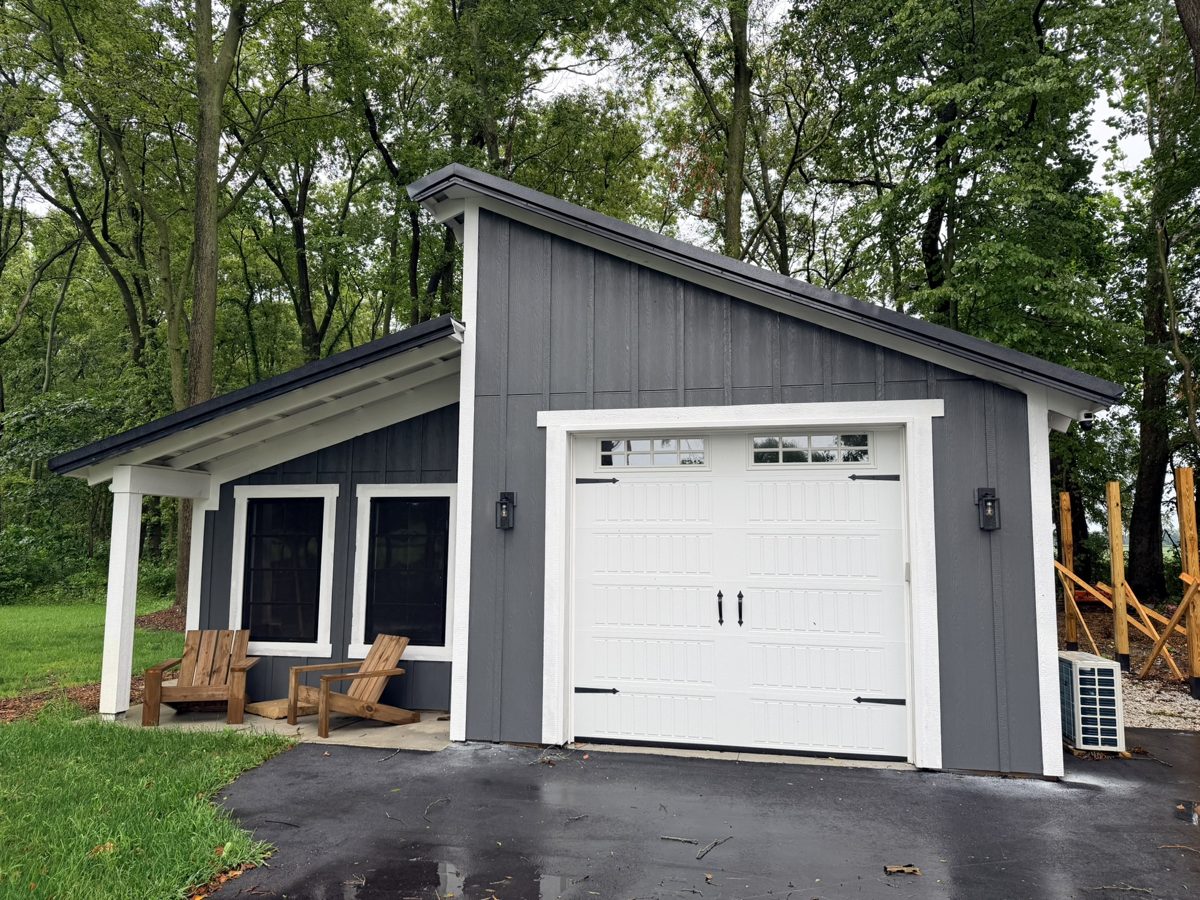
Walk past any pole barn in America and I'll bet you money it's wrapped in steel. Steel is cheap, it's fast, and there's nothing wrong with it. But when it came time to side my own DIY pole barn, I went a completely different direction: fiber cement pole barn siding with LP trim, installed board and batten style. Nobody does this on a pole barn — and after decades of hands-on DIY experience, that's usually my cue that it's worth a hard look. In this post I'll break down exactly why I skipped steel, what it cost me down to the dollar, how the install went as a one-man operation, and the one thing I'd change if I did it again.
Yes, you can side a pole barn with fiber cement and LP trim instead of steel. Siding my pole barn this way cost me $5,800 in materials in 2025 and took 32 hours of my own labor. The pro quote for metal board and batten on the same barn was $18,000. I chose fiber cement to exactly match my house — and I'd do it again, with one material change I cover below.
Can You Put Fiber Cement Siding on a Pole Barn?
Yes — there's no rule that says a pole barn has to wear steel. The one real structural difference is that fiber cement panels need OSB sheathing behind them, while steel panels fasten directly to the girts. If your barn is already sheathed (mine was), fiber cement is absolutely on the table.
So why doesn't anybody do it? Cost and speed. Steel is cheaper per square foot and goes up faster. But here's the thing steel can't do: match your house. We built my house about seven years ago with fiber cement and LP trim, and I wanted the barn in the exact same colors. You can get steel close to the color — and close isn't good enough. When the barn sits in view of the house, "almost matching" looks worse than not matching at all. If you're still in the planning phase of your build, my full pole barn build guide with cost breakdown covers everything that happens before siding day.
Why I Chose Fiber Cement and LP Trim Over Steel
Let me be straight with you: steel siding is a fine product. It's cheap, it's effective, and if this were a hay barn in a back field, I'd have used it without a second thought. I chose fiber cement and LP trim because I'd sacrifice DIY labor for better quality materials any day of the week.
Three things sold me. First, the match — same colors, same board and batten look as my house, clean lines from the street. Second, the track record: the LP trim on my house has been up seven years with zero problems. Third, durability — between the fiber cement panels and the battens covering every nail, this barn is bulletproof. The wood grain texture on the panels reads as real board and batten from ten feet away, and once it's caulked and painted, you can't find a seam.
I filmed the entire install — from the first panel to the last batten, including every jig and trick in this post:
How Much Does Fiber Cement Siding Cost Compared to Steel?
Here are my real numbers. Siding my pole barn with fiber cement panels and LP trim cost me $5,800 in materials in 2025, and the install took me 32 hours working alone. Before I started, I got a quote from Daryl — the same pro who set my posts and did my metal roof — to side the barn in metal board and batten. His price: $18,000, broken down as $8,000 in materials and $10,000 in labor.
Sit with that for a second. The pro's materials alone for metal board and batten cost more than my entire fiber cement job. Doing it myself saved me $12,200, which works out to about $381 per hour for my 32 hours of labor. I don't know many side gigs that pay $381 an hour.
Now, the honest caveat: buying steel panels yourself, retail, is generally cheaper than buying fiber cement yourself. The wide LP trim boards I used around the garage door ran about $55 apiece, and at that price there's no room for mistakes. Fiber cement is the more expensive DIY material — you pay for what you get. But stacked against what most people actually do, which is hire it out, my "expensive" choice was a third of the price.
How I Installed It — Board and Batten Style
Hanging the Panels
I started on the straightest wall, where a single 10-foot sheet covers top to bottom. I nailed 2x4s along the bottom as a ledger to rest the panels on, hanging the fiber cement about 1/4 to 1/2 inch below the OSB so water can't wick up behind it. Panels are 4 feet wide; I marked a centerline on the wall and butted my first two panels there — no gap needed between panels. Nail spacing is 6 inches on the edges and 8 inches in the field, shot with a roofing nailer. I made a simple jig from a nail and a block that let me hit 16 inches on center every time without measuring. Family Handyman's guide to installing fiber cement siding backs this up — pros run the same blind-nail approach, and every nail disappears once the battens go on.
Battens, Corners, and Windows
Battens are 1x3 LP trim, 16 inches on center — each 4-foot panel gets four battens, with one covering each seam. Every board goes prime side down, cut side up, so the factory-primed edge is what faces weather. For outside corners, I ripped the 1x6 down so that with the 3/4-inch overlap you get an even 5-1/2 inch reveal on both faces — it's a small detail nobody notices until you get it wrong. For the vinyl windows, I built a jig that offsets the trim 5/8 of an inch all the way around; the window flange sits inside that reveal, sealed with silicone. Same vinyl windows I put in my screen porch four or five years ago — no issues.
Stacking Panels Up High
Where the wall runs taller than one sheet, there's a trick: flashing sits on top of the lower panel, you leave a 1/8-inch gap, then the next panel continues up. The batten runs right over the whole joint and you never see it.

One tool that could earn its keep on this job more than any other: the Huepar 48" digital level that literally tones when the board hits perfect plumb. When you're wrestling a 10-foot batten alone, having the level tell you it's plumb instead of having to eyeball a bubble is a game changer. I collaborate with Huepar because I use their stuff on every build and they recently came out with this new tool — you'll see a similiar tone level working in the video.
Fiber cement panels with a wood grain texture have a direction — and the grain has to run vertical. I didn't think that through, and it cost me. Every offcut with horizontal grain was useless, so my waste pile grew way faster than it should have. If I'd bought non-grain (smooth) panels, I could have run boards any direction and used nearly every scrap. Factor grain direction into your material order or budget an extra sheet or two.
Is Fiber Cement Siding Hard to Install Yourself?
It's not hard — it's just a lot of work, especially alone. There's no single step in this job that an intermediate DIYer can't handle. The nailing schedule is simple, the jigs do the thinking for you, and the battens hide your sins. What nobody tells you is what the material takes out of your body.
These panels are brutally heavy for one person. Getting a full sheet up onto sawhorses about killed me the first time, and the 10-foot battens aren't much friendlier — carrying four of them at a time across the yard is its own workout. Cutting means a respirator and goggles every single time, because fiber cement dust is silica and it's not something to be casual about. And in summer heat, I was out at 7:30 in the morning and done by noon, because once the sun cleared the trees and bore down on that wall, it was unworkable. This install landed on day 100 of my barn build, and by the last wall I was done with siding in every sense of the word. Worth it — but go in with your eyes open.
What I'd Do Differently Next Time
As much as I love how the fiber cement turned out, I'd make one change on the next build: I'd use LP panels instead of fiber cement, and I'd go non-grain. Two reasons. LP panels are a heck of a lot lighter — which matters enormously when you're a one-man operation muscling full sheets up a wall. And going smooth (non-grain) eliminates the grain-direction problem entirely, so nearly every offcut gets reused instead of tossed on the waste pile.
That's not me talking down the fiber cement. It's on my barn, it looks incredible, and it'll outlast me. But part of doing these projects yourself is learning what you'd optimize the second time — and that lesson only costs you once.
I filmed every step of this siding install — the panel jigs, the corner trick, the window trim, and the final reveal. Watch the fiber cement siding video on YouTube → and subscribe to the channel so you don't miss the rest of the barn build. Building something yourself? Grab my 28x32 DIY pole barn plans, and every tool I trust is on my tools page.
FAQ
Can you put fiber cement siding directly on pole barn girts?
No. Fiber cement panels need continuous OSB or plywood sheathing behind them for nailing and support. Steel panels can fasten directly to girts, which is one reason steel is the cheaper and faster option on pole barns.
How much does it cost to side a pole barn with fiber cement?
Siding my pole barn with fiber cement panels and LP trim cost me $5,800 in materials in 2025, doing all 32 hours of labor myself. A professional quote to side the same barn in metal board and batten came in at $18,000.
Is fiber cement or steel siding better for a pole barn?
Steel is cheaper, lighter, and faster to install, and it's the right call for most utility barns. Fiber cement wins on curb appeal, exact color matching to your house, and a premium board and batten look — at the cost of weight, cutting dust, and installation time.
How long does fiber cement siding installation take?
Installing fiber cement siding and LP trim on my pole barn took me 32 hours working alone, from the first panel to the last batten. A crew of two or three could cut that time significantly — the panels are the hardest part for one person.
As an Amazon Associate I earn from qualifying purchases. Some links in this post are affiliate links — if you buy through them, it costs you nothing extra.
28x32 Pole Barn Plans
The complete plan set from my real build. Two-bay layout, bookshelf girts, optional front and rear porches.