
Most people see a mini split and picture that one wall-mounted unit blowing air into a single room. That's not the whole story. I put a fully ducted mini split into my pole barn, ran spiral ductwork the length of the building, and it changed how I think about heating and cooling a big open space with weird ceiling heights. Here's exactly how I did it, what it cost, and what I'd tell you before you try it yourself.
Yes, mini splits can run ductwork — it's called a ducted mini split, and the indoor unit connects to a duct system instead of blowing air straight into a room. I installed a 3-ton TOSOT ducted mini split with spiral ductwork in my 28x32 pole barn for just under $4,200 in 2025, using the coupon code HOMEPROHERO for 10% off. The whole install took about 12 hours from start to finish, and it's kept the barn between 54°F at the unit and under 60°F at the last vent.
Can a mini split have ductwork?
Yes — a ducted mini split uses the same outdoor compressor and refrigerant line setup as a standard wall-mounted mini split, but the indoor unit is a compact air handler that connects to ductwork instead of blowing air directly into the room. Most homeowners have only ever seen the wall-mount version, so when people find out mini splits can be fully ducted, it usually changes how they think about heating and cooling an open space like a garage, shop, or barn.
The indoor unit I used is about 2 feet wide and a little over 4 feet long, and it gets hidden completely out of sight — mine sits up in the loft above my garage door, a space that would otherwise just be dead air. From there, it pushes conditioned air through ductwork instead of a single wall grille, which means you can actually move air to multiple rooms or zones from one unit.

Why I went with a ducted TOSOT system for my pole barn
I went ducted because my pole barn has three completely different ceiling heights — 20 foot, 12 foot, and 7 foot — plus lofts on both ends, and a single wall-mount unit was never going to handle that kind of layout. A 28x32 building with that much variation in ceiling height creates a lot of different microclimates, and a ducted system lets me actually distribute air where it needs to go instead of just dumping it all in one spot.
I picked a 3-ton unit from TOSOT, which is bigger than what the barn needs right now, on purpose. I'm planning to add onto the barn later, and since this system is variable speed, it can throttle down for the barn's current size and scale up when I expand. That's the advantage of variable-speed compressors — Family Handyman's breakdown of mini split systems gets into how that inverter-driven technology adjusts output instead of cycling on and off at full blast, which is exactly why I didn't have to worry about oversizing the unit for today's footprint.
I already had the barn insulated with spray foam and R19, so I had a good R-value to work with before any of this went in. And instead of just cutting a hole in the wall and slapping a vent on the indoor unit — which absolutely works and is the easier route — I paid to have spiral ductwork custom fabricated so it would tie seamlessly into the mini split's indoor unit and run right down the center of the barn below the windows. I wanted the pro, industrial look, not just function.

How much does it cost to install a ducted mini split in a pole barn?
A 3-ton ducted TOSOT mini split with custom spiral ductwork cost me just under $4,200 in materials in 2025, after a 10% discount that saved me $300 — you can get the same discount with code HOMEPROHERO on any TOSOT order. That price covers the indoor and outdoor units, refrigerant lines, electrical disconnect and wiring, the fabricated spiral duct transition pieces, and the vents. It does not include labor, because I did the whole install myself in about 12 hours, spread across a day and a half.
That cost is going to swing depending on whether you go with standard vents instead of spiral ductwork — the custom fabrication is the one piece I'd call optional. If you just want function and don't care about the look, cutting that out drops your cost noticeably.

The install, step by step
Mounting the indoor unit in the loft. I wired the electrical and thermostat connections on the ground first — white/blue, black in the middle, brown/red on the third terminal, ground to the green screw, and a simple plug-in for the gray thermostat wire — before lifting the unit up into the loft. Doing the wiring prep at ground level saved a lot of headache once the unit was up in a tight space.
Running the copper lines without kinking them.
I kinked my first set of copper lines on an earlier mini split install, and it cost me time and material to fix. This time, I used anti-kink insert tubes on both the 5/8" and 1/4" lines before running them — they slide inside the copper and physically prevent it from crimping when you bend it.
If you've ever worried about kinking a line, use insert tubes like these — it's cheap insurance against redoing the whole run.
Electrical, disconnect box, and vacuum test. I mounted the disconnect box 36 inches off the ground to stay code compliant, ran 10-2 gauge wire from the breaker panel, and pulled a vacuum on the line set for about 30 minutes to check for leaks before charging the system. I don't wire anything with the power live — I always kill the breaker first. Once the gauge held steady at -30 for over two hours, I knew the lines were tight.
Spiral ductwork and vent layout. I used a Huepar laser to lay out a perfectly level line 14.5 inches off the wall, running the full length of the barn from front to back, then drilled and cut the vent holes with a jigsaw and a metal-cutting blade — way easier than I expected, and a lot safer than the grinder I almost used instead. For duct sizing and airflow calculations, I ran the numbers through ChatGPT, which told me exactly what pipe size, vent size, and vent placement I needed for the CFM this unit puts out. That's not something most install guides tell you to do, but it took the guesswork out of sizing ductwork I'd never built before.

Can you run spiral ductwork off a mini split?
Yes, but it's more involved than a standard vent install — spiral ductwork on a mini split requires custom-fabricated transition pieces to connect the round duct to the indoor unit's rectangular opening, and every turn needs to be a swoop or a 45-degree angle rather than a sharp 90, or you lose airflow power. I had the transition pieces professionally fabricated so they'd seat cleanly against my unit's return air opening, and pairing the big spiral duct down to the smaller run through a cone connector was genuinely one of the more frustrating parts of the whole project — worth knowing going in if you're planning the same look.
If you don't care about the industrial aesthetic, skip this step entirely. Cut a hole behind the wall, mount a vent, and you're done — it'll perform just as well functionally. I only went the spiral route because I wanted that look in this specific space.
Ready to run your own numbers? Grab the same 3-ton TOSOT ducted mini split I installed and use code HOMEPROHERO for 10% off any order at TOSOT Direct. I used a Huepar laser and mini level for the ductwork layout, a torque wrench for the line connections, a pump and gauge set for the vacuum test, and a spyder hole saw kit for the wall penetrations. For more of the tools I run on every build, check out my tools page. And if you want to see the full install in real time, subscribe on YouTube and follow along on Facebook.
Was it worth it? Final results
The ducted mini split has kept my pole barn comfortable across every zone since day one — I let it run overnight after the first charge with no issues at all. The unit itself sits at 54°F, and I'm still pulling under 60°F all the way out at the last vent in the run, which tells me the spiral ductwork and vent sizing are actually performing the way they're supposed to. For a 28x32 building with three different ceiling heights and two lofts, that's a level of even coverage I never would have gotten from a single wall-mounted unit.
FAQ
Can a mini split have ductwork?
Yes. A ducted mini split uses a concealed indoor air handler connected to ductwork instead of a visible wall-mounted unit, letting one system distribute air to multiple rooms or zones.
How much does it cost to install a ducted mini split in a pole barn?
I paid just under $4,200 in materials in 2025 for a 3-ton TOSOT ducted mini split with custom spiral ductwork, after a 10% discount. Skipping the custom spiral duct fabrication for standard vents would lower that cost.
Can you run spiral ductwork off a mini split?
Yes, but it requires custom-fabricated transition pieces to connect the round spiral duct to the indoor unit, and all turns need to be swoops or 45-degree angles rather than sharp 90s to maintain airflow.
What size mini split do I need for a pole barn?
It depends on square footage, ceiling height, and insulation, but I sized up to a 3-ton variable-speed unit for my 28x32 barn specifically because I plan to expand the building later — the variable speed lets it run efficiently at the barn's current size in the meantime.
Do I need spiral ductwork, or can I just use a vent?
You don't need spiral ductwork functionally — cutting a hole behind the wall and mounting a standard vent works just as well. Spiral duct is purely for the exposed, industrial look.
Build it from the plans
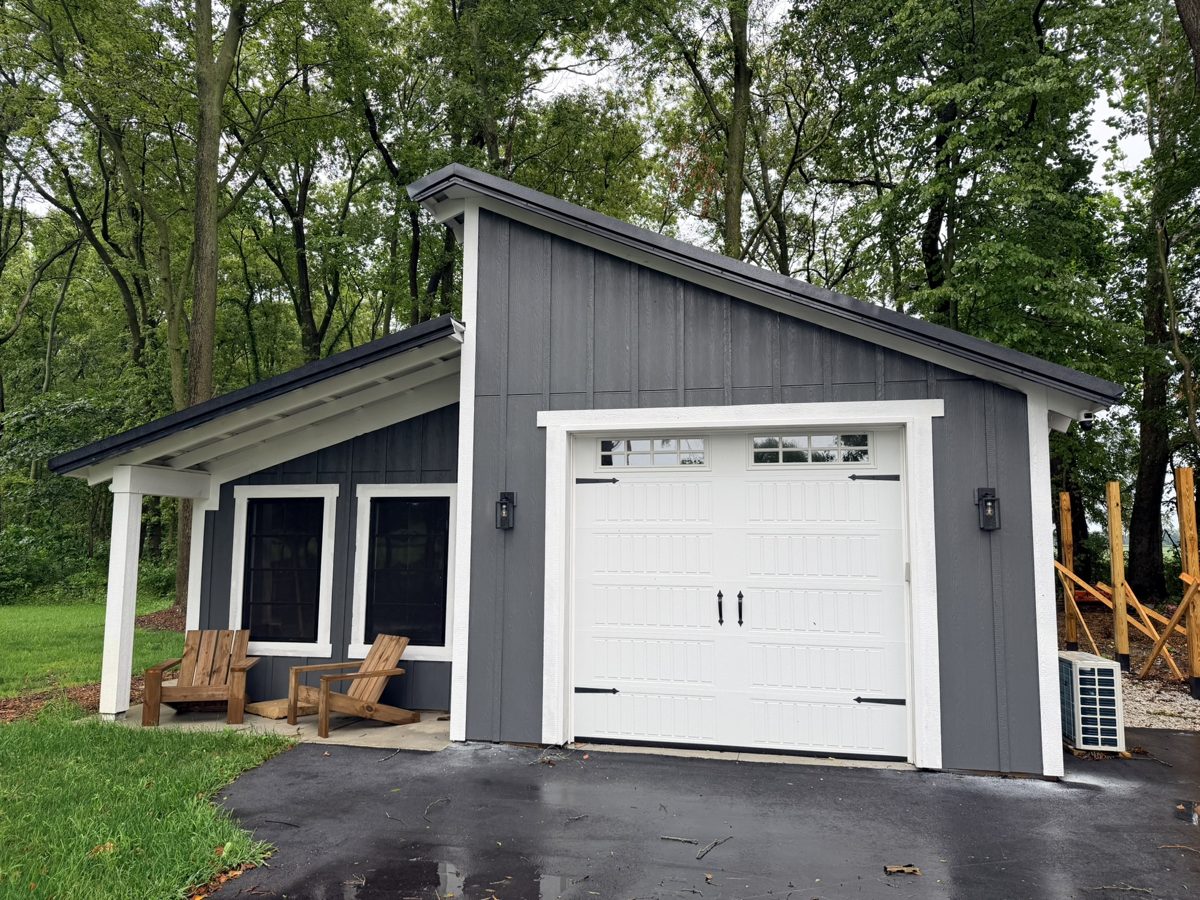
This is the barn the
mini split went into.
28ft × 32ft, dual-pitch roof, two-bay layout, bookshelf girts, built on a budget. If you’re planning your own, the full plan set covers every stage from post setting to siding — 75+ numbered steps, 30 printable pages and the complete material list.
- 30 printable pages
- 75+ numbered steps
- Full material list
- Bonus SketchUp file
Instant PDF download. Drawn from the real 28x32 build, not a generic drawing.
As an Amazon Associate I earn from qualifying purchases. Some links in this post are affiliate links — if you buy through them, it costs you nothing extra.
28x32 Pole Barn Plans
The complete plan set from my real build. Two-bay layout, bookshelf girts, optional front and rear porches.